There are affiliate links in this post.
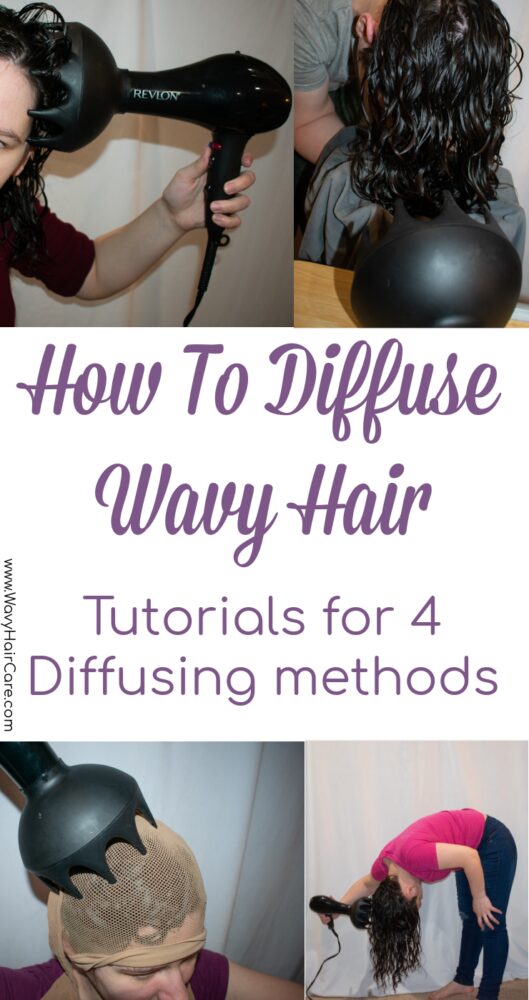
How To Diffuse Wavy Hair
I diffuse my hair every single wash day. For me, air-drying just isn’t practical because it literally would take all day. Diffusing is a way of blow drying your hair without disrupting your curls, and without heat damage.
Diffuser attachments for blow dryers basically just disperse the air so that it comes out from several smaller sources rather than the entire barrel of the end of a blow dryer.
For many people, diffusing can help your curls to dry in a tighter pattern, by drying your hair quicker, before it has a chance for the water in your hair to weigh down your pattern.
I have a whole post on air drying vs diffusing wavy hair already. So I’ll cut to just talking about diffusing!
How do you diffuse wavy hair? Well, there are multiple techniques. I’ve prepared to cover four of the ways that I’ve seen discussed most often. The first diffusing tutorial I ever watched was pixie diffusing so that became my default and it’s what I usually do, still. I did find benefits to some other diffusing techniques though, so I may change it up in the future!
For those who may be curious, my blow dryer is the Revlon Pro Collection IONIC Hair Dryer (available through Walmart) and my diffuser attachment is the Xtava black orchid from Amazon.
I bought both of them nearly 3 years ago and they’ve held up great. The diffuser comes with a ring in the base that you can remove to make the opening slightly wider. You have to do that to get the diffuser to fit on the dryer I have, but it’s a perfect fit once you take out that removable ring.
Important notes:
My instructions on these various methods say which sections to do, and in some cases, which position to do them in. You can change these up, if you prefer. Some people diffuse upside down, and others diffuse rightside up. I have a post on rightside up vs upside down wavy hair styling if you’d like to learn more about the pros and cons of each.
I like some of the benefits of upside down, but I am not able to remain fully upside down the entire time that I need to diffuse. So when pixie diffusing, I diffuse upside down for about 5 minutes, then move to rightside up (or sideways) diffusing for the rest.
If you want to try diffusing upside down the entire time, I recommend reading my post how to style your hair upside down without getting a mess in the back.
It helps explain the very important difference between truly upside down styling vs ‘leaning over’ styling, with visual examples. People often say they can’t style upside down as it messes up their hair. They’re usually leaning over rather than truly being upside down.
Anyway, it’s important to consider how long you can stay truly upside down. You may also want to consider the sections of your hair and which one(s) make sense to do earlier.
I usually diffuse my front left side first because that is my straightest section, so drying it first gives it less change to get weighed down by water. This is a key method I use for balancing out my uneven curl pattern.
My routine for testing all 4 diffusing methods:
I used Not Your Mother’s Curl Talk Shampoo (quarter amount), Johnson’s strengthening conditioner (half-dollar amount) and Not Your Mother’s Curl Talk mousse (3 handfuls). In all cases, I plopped for 10 minutes after getting out of the shower, and scrunched for about 2 minutes after adding the mousse.
If you want to know other products I like and would recommend check out my wavy hair product recommendations page.
How to pixie Diffuse Wavy Hair
This is how I pixie diffuse. You can change up the sections or positions if you wish.
- Wash your hair and add your styling products.
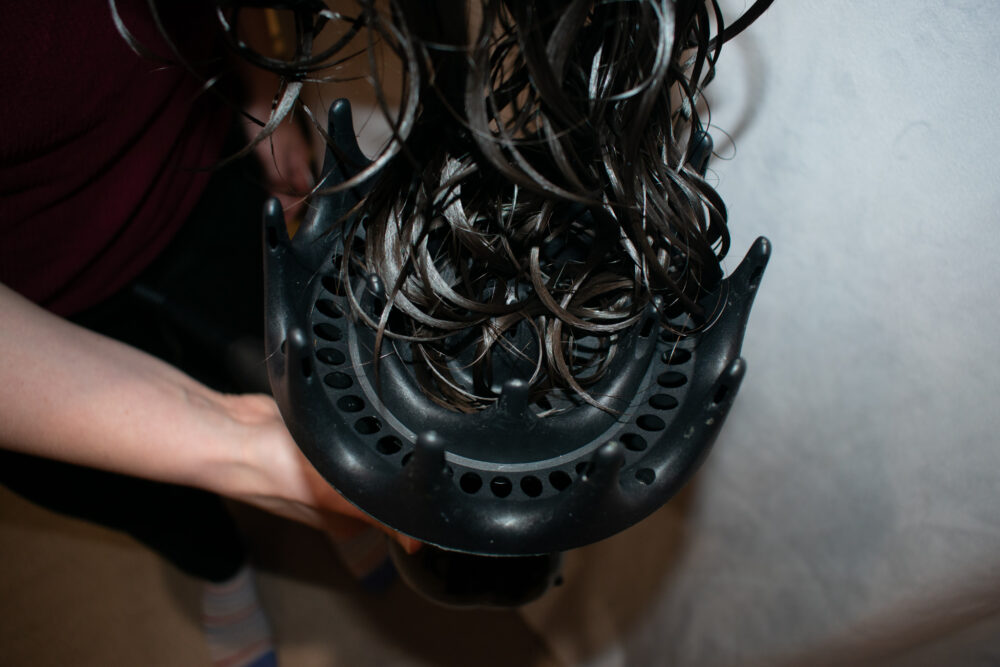
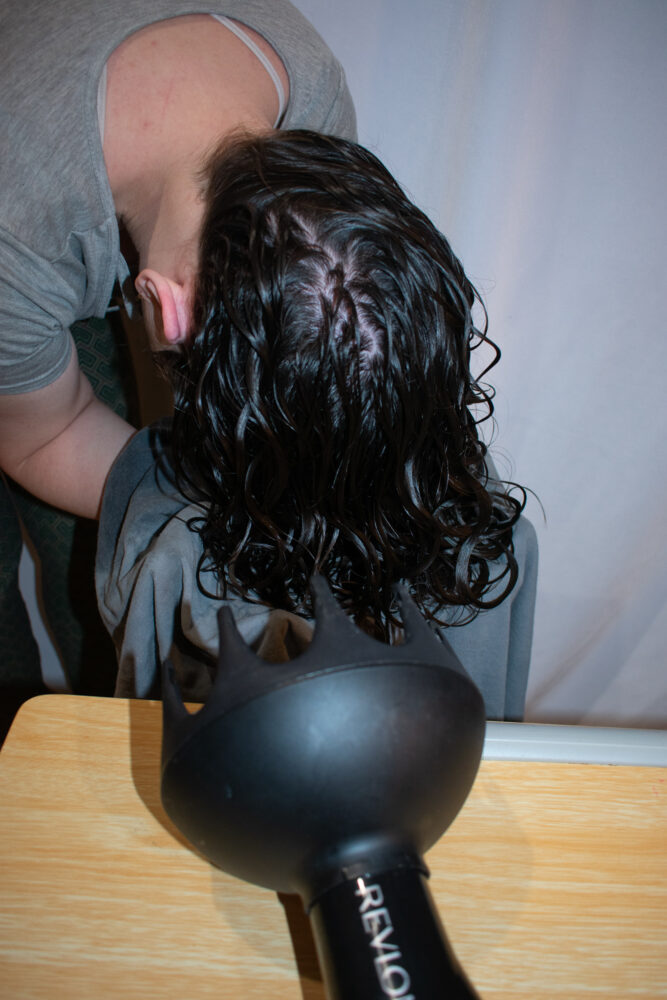
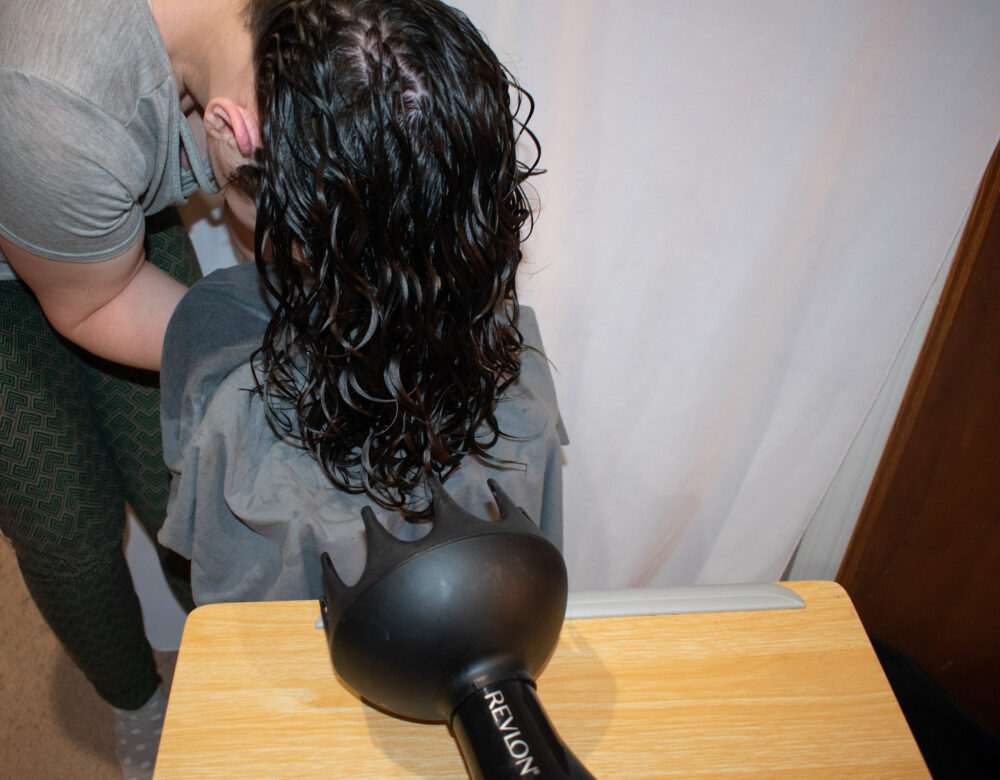
- Gather all your hair into the diffuser from below, while your head is upside down. Aim to have your hair fall into the diffuser in their natural pattern.

- Raise the diffuser up until it reaches your head.
- Turn the blow dryer on. I use low speed and low heat when pixie diffusing. Your hair is directly contacting the hot air while pixie diffusing, so using high heat on your dryer could potentially cause heat damage.
- Hold the blow dryer/diffuser in place. I keep mine on for 5 minutes during this first section that holds all my hair, but my hair is low porosity and thick. 1-2 minutes may be better for thin, high porosity hair. You don’t want it to dry too much while in this position as it may mess up the back of your head, in particular.
- Turn the blow dryer off.
- Lower the diffuser away from your head.
- Stand upright and correct any pieces of hair that are really out of place.
- Gather a section of hair into the diffuser from below. I do 1/4 sections I do my front left first because it’s my straightest section.
- Raise the diffuser up until it’s contacting your head.
- Turn the blow dryer on using low speed and low heat.
- After 5 minutes, turn off diffuser, lower it, and move to the next section. Repeat until you’ve covered all sections.
- Diffuse more as needed. After you’ve diffused all sections of your head, go back and re-cover areas as needed until your hair is about 90% dry. I typically do each section twice, and after that will target individual damp areas.
- Air dry. Once your hair is about 90% dry, air dry the rest of the way. You don’t want to diffuse to 100% dry as it will cause frizz.
- Break your hair cast. Once 100% dry, scrunch out the crunch!
Pixie diffusing video tutorial from Swavy Curly Courtney:
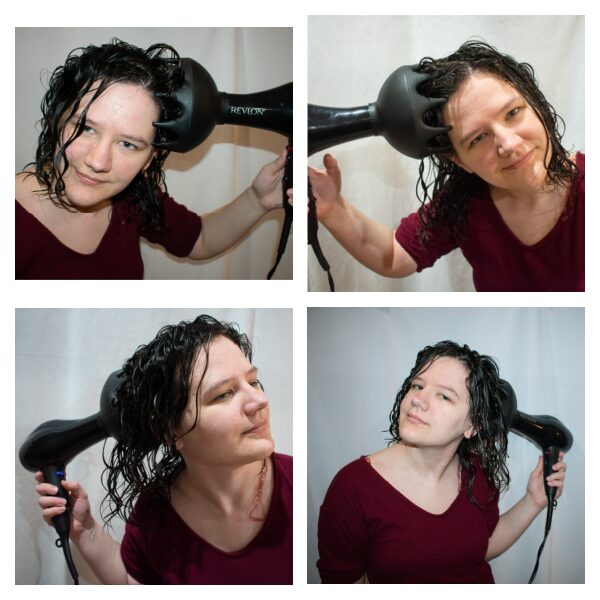
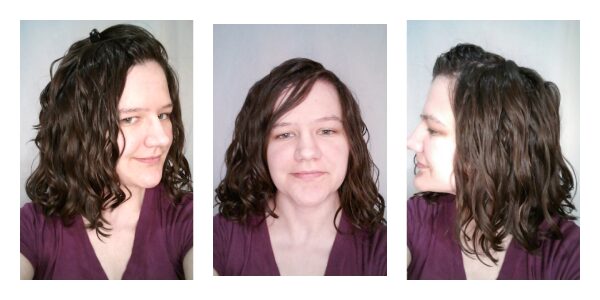
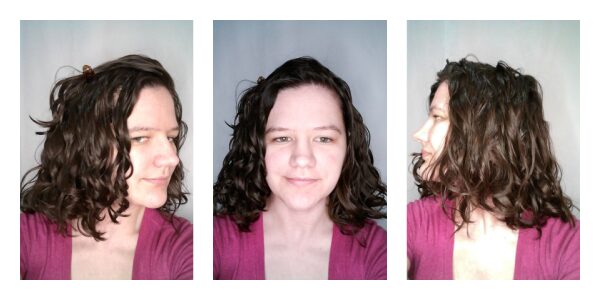
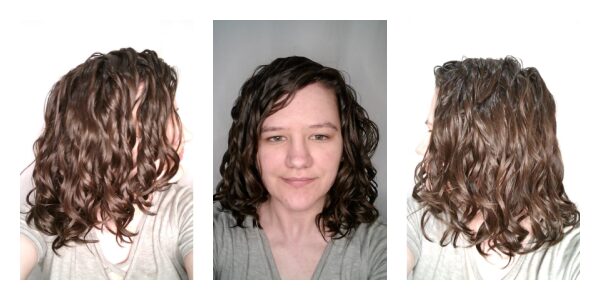
Results from pixie diffusing:
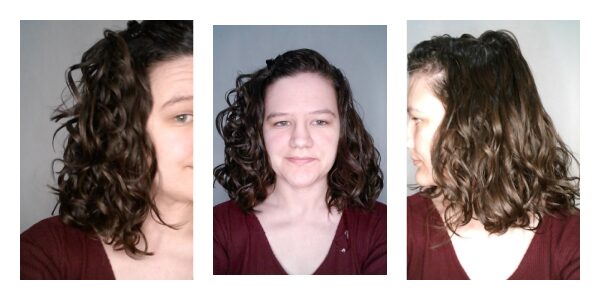
Pros and cons of pixie diffusing
The pros:
Pixie diffusing offers great volume. It holds the ends of your hair as it’s drying, so you aren’t working against gravity. Because you get the diffuse right up into your hair, you can target any/all areas that you want to.
My diffuser has air holes on the sides of the prongs, so when the prongs are up against my scalp, it’s helping to directly dry my roots. With most other diffusing methods, my roots are the hardest to dry (probably because they’re lowest porosity). With pixie diffusing with this diffuser style, my roots dry at the same time as the rest of my hair.
The cons:
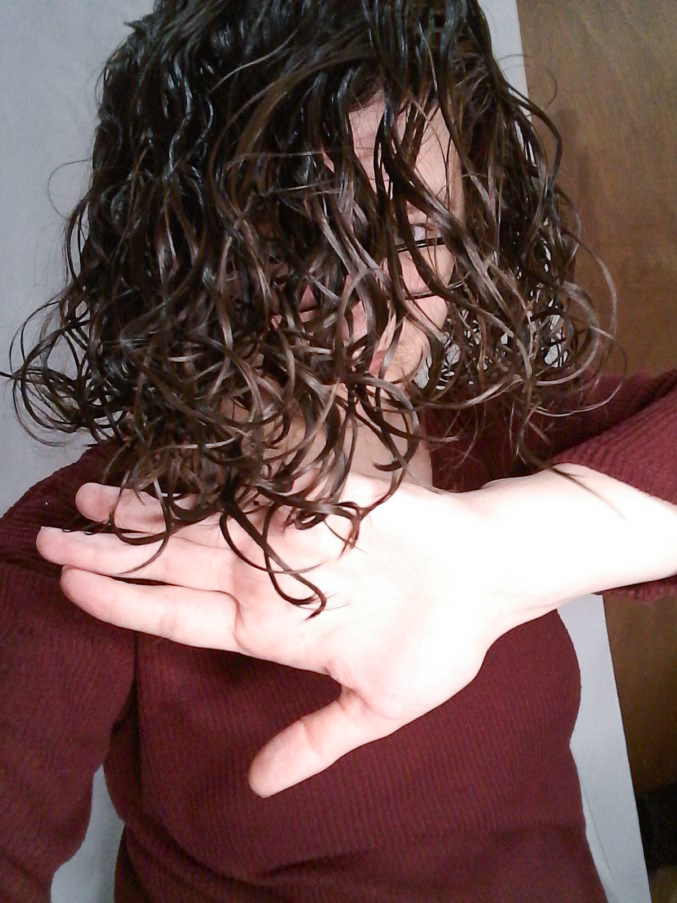
It’s challenging to control how every hair falls into the diffuser. If any hairs collect in the diffuser in a strange position, they’ll dry in a strange position. That’s why I included the last photo above – to show some hairs that dried in a strange pattern at the tips.
That’s not my curl pattern, they just were smushed funny in the diffuser so that’s how they dried. I personally don’t usually notice these wonky pieces once I scrunch out the crunch (that picture was still in a cast). Still, it’s a bit of a downside.
Another downside is heat level. Because pixie diffusing causes the diffuser to directly contact your hair, most people who pixie diffuse choose to avoid high heat. this can slow down the diffusing process. Of course, you make your own rules so some may choose to diffuse on high heat. Damage risk aside, I personally would find it physically uncomfortable, I think.
A third downside is risk of frizz. Loading your hair into the diffuser puts your hair in contact with the diffuser itself. This physical contact can cause friction and frizz. Or, your hair being closer to the holes in your diffuser may cause your hair to be blown about a bit if the air speed is set higher. This can also potentially introduce frizz.
How To Hover Diffuse Wavy Hair
The general idea with hover diffusing is to hover your diffuser around your hair, without touching it. Because this style of diffusing doesn’t have your diffuser contact your hair, you can use higher heat, and are at less risk of frizz. There is less physical contact with your hair which means less friction and potential for frizz.
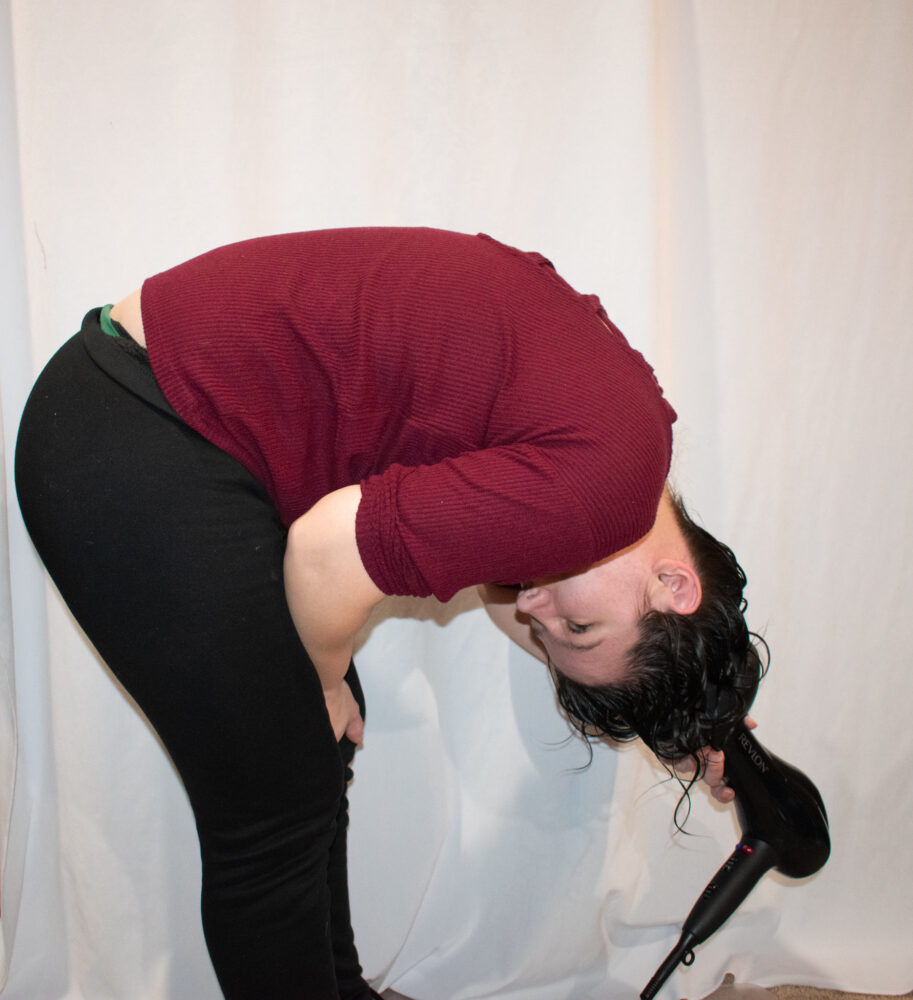
- After showering and adding your styling products, tip your head upside down.
- Turn your diffuser on and point it at your hair.
- Hover the diffuser around the front and back of your hair near the roots. You want your roots to dry first so they don’t get stretched out and cause you flat roots.
- After your roots are partially dry, hover around the rest of your hair.
- Hover around all of your hair in front and back until your hair is dry.
- Alternatively, you can hover only until your hair has formed a cast, then pixie diffuse the rest of the way (Starting at step 9, above).
Some people like to hover diffuse just until they form a cast, so that pixie diffusing doesn’t cause them any strangely-shapen ends. IF you form a cast before pixie diffusing, you won’t have misshapen pieces. Plus, then you don’t have to stay upside down as long!
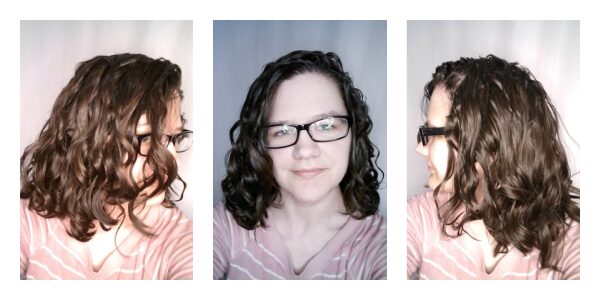
Others hover diffuse until their hair is dry. I tried hover diffusing the whole time, and I tried hover diffusing until I formed a cast.
Results from hover diffusing until 90% dry:
Results from hover diffusing until a cast, then pixie diffusing (Below)
Pros and cons of hover diffusing
The pros:
Hover diffusing, whether done the entire time or just done until a cast forms, will allow your hair to dry in their natural curl clumps, without any wonky pieces. They dry without being touched, so no bending will occur.
Hover diffusing the entire time will mean that you can use high heat the entire time. This can speed up your diffusing time, perhaps more so if you have lower density hair so the middle of your hair doesn’t stay wet. It took me about 42 minutes to diffuse when hover diffusing and pixie diffusing together. When I hover diffused the whole time, it took 39 minutes.
The cons:
If you have dense hair, hover diffusing may leave the middle of your hair wetter, seems how you are just hovering around the outside of your hair and not getting up in the middle.
Less volume. At least for me, I definitely had the least volume when hover diffusing the entire time. My hair is easily weighed down by itself when it’s wet, which is why diffusing makes a really dramatic difference for me.
Hover diffusing leaves your hair hanging as it dries, so it’s pulled by its own weight. This allows hair to stretch out some, or at least, doesn’t help hair fight water-weigh-down and gravity as much as diffusing techniques that support the hair as it dries.
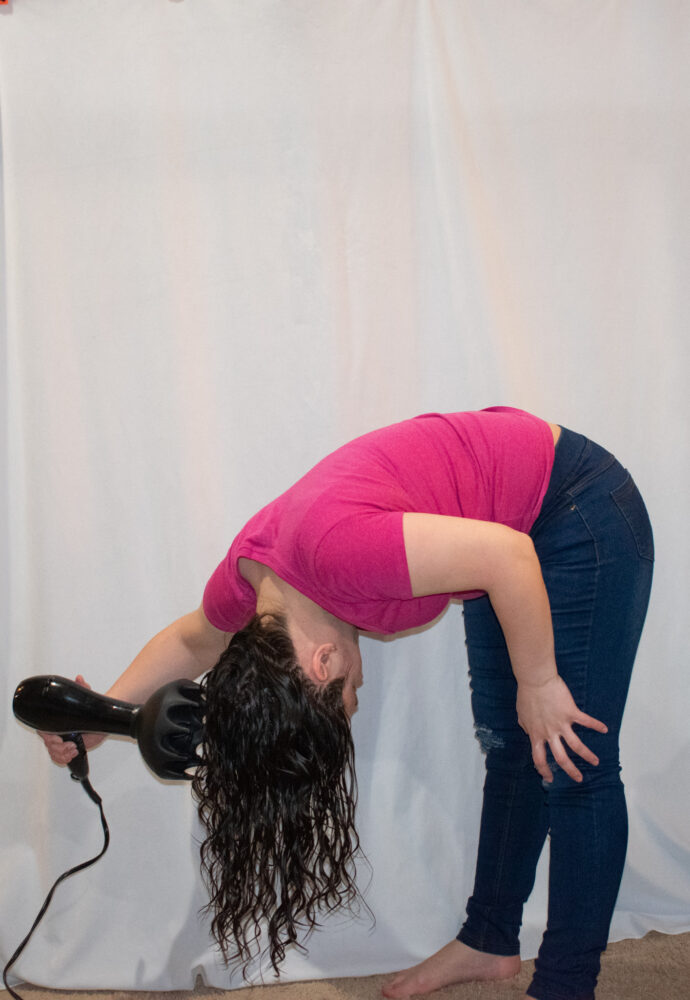
How To Hammock Diffuse Wavy Hair
Hammock diffusing is like hover diffusing while supporting your hair against gravity. This method was created by Ali of @wavycurly on Instagram.
- Arrange your blow dryer and diffuser on your counter.
- Stand in front of your diffuser and lean over so that your head is aligned with the diffuser.
- Use a microfiber towel or t-shirt to scoop up your hair from below. You want your hair to gather into the towel/t-shirt in their natural pattern.
- Hold the t-shirt up near your roots so that your hair strands are held in the towel but your roots are exposed.
- Turn on the diffuser and diffuse your roots on all sides, while supporting your hair in the t-shirt. You can diffuse on high heat seems how the diffuser isn’t in direct contact with your hair.
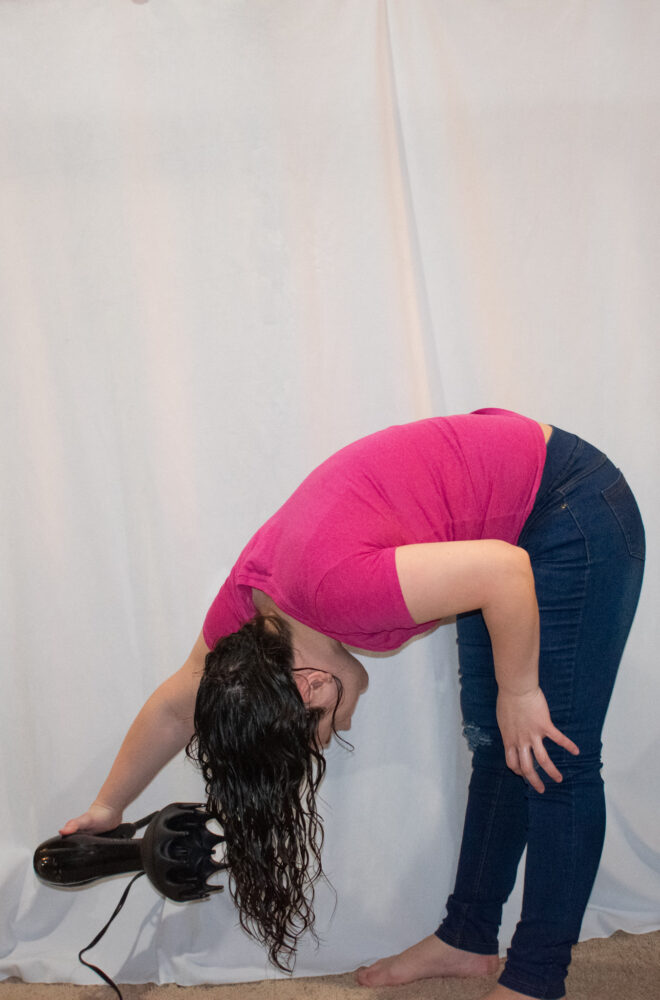
- As your roots begin to dry, lower the t-shirt and diffuse the next few inches of hair.
- As that section begins to dry, lower the t-shirt more and diffuse the next few inches. Continue until you’ve reached the end of your hair.

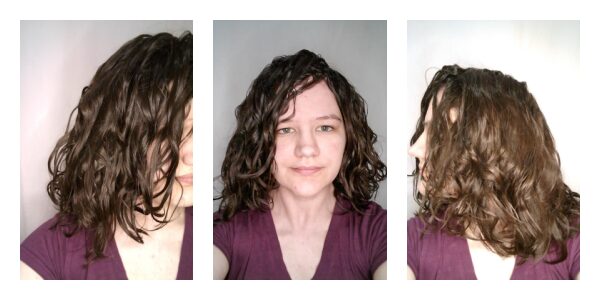
Results from hammock diffusing:
Pros and cons of hammock diffusing
Pros:
Great definition, including definition higher up on my head than usual. Good volume, thanks to the hair being supported as it dries. Natural curl pattern, no deformed pieces. You can diffuse on high heat thanks to the diffuser not touching your head. That saves time. I hammock diffused in about 35 minutes which is the fastest diffusing results I’ve got from any diffusing method.
Maybe a coincidence, but my side part dried in its natural position, including in front. I usually have to clip the front of my hair (What would be my bangs) because they dry in front of my face. They didn’t when diffusing this way. If this wasn’t a coincidence it would be a benefit!
Cons:
You have to be on your feet but bent over the whole time, and you have to keep moving positions in front of the diffuser to get all sides of your hair. My back hurt a little by the time I was done.
However, diffusing while holding the diffuser used to make my arms tired, but they adjusted over time. I assume I built up my arm muscles a bit by diffusing, as funny as that sounds. Anyway, I imagine that my back could also build up muscle and get used to leaning over if I were to regularly diffuse this way.
Video tutorial for hammock diffusing:
How To Net Diffuse Wavy Hair
Net diffusing is using fishnets or a hair net or similar to hold your hair on top of your head while you diffuse. It’s almost like diffusing while your hair is in a plopping position. I bought these Hanes fishnets in size small, color ‘nude’ to use. I liked how they were tighter knit than many others, so I knew my curl clumps wouldn’t fall out the holes.
-
- Lay a pair of fishnet stockings (or a hair net or other mesh/netted head covering) on a surface.
- Gently lower your hair into the center of the net.
- Pull the edges of the stockings or net up around your hair line.
- Stand up, your hair should be supported in the stockings/net.
- If you’re using stockings, you can tie the legs to help secure the top of the net.
- Use your diffuser on top of the net, moving all around until your hair is dry.
- Remove the net.
The first time that I tried net diffusing, I diffused for about 30 minutes, and I could tell that the hair on the outside of the net had hard cast and felt dry. I removed the net. Only the hair that was on the outside of the net was dry. Most of my hair was still quite wet! Especially the hair on top of my head. So, I hover diffused the top center of my hair until it was dry.
(from the first attempt, net diffusing about 45 minutes, then hover diffusing my roots)
The second time I tried net diffusing, I knew I needed to focus on the center of my hair seems how that part stayed wet. This time, I diffused while leaving the diffuser on high heat just above the center of my head, hoping that the high heat would penetrate deeper into the cap. I noticed that the outside got dry.
Instead of removing the cap, I gently let a hand up into the net to try to check the center of my hair. It was still wet, so I kept diffusing right at the center for another 20 minutes. I checked again, and it was still damp, but a lot closer to dry.
It had been a full hour. I decided to remove the cap because I didn’t think I could get good access to the center of my hair this way. When I removed the cap, my hair had dried tight to my face in really weird shapes. I hover diffused the roots of my hair and the center in the back, which were still damp.
(from the second attempt, net diffusing an hour then hover diffusing my roots)
pros and cons of net diffusing
Pros:
This diffusing style could be used with a bonnet dryer/diffuser to allow you to diffuse hands-free.
Cons:
When done partially and fully, it left my hair dried in strange, unnatural shapes. In both cases, the roots of my hair stayed wet due to my hair being on top of my roots. When I net-diffused longer, it left my roots really sticky.
I assume this was from my mousse falling out of my strands onto my scalp as it sat longer. This method, at least for dense hair like mine, doesn’t allow al the hair to be accessed by the heat, so it takes a lot longer to get the center of the hair in the net to dry.
Perhaps this method would work better for low density and/or shorter hair.
Diffusing styles compared:
Pixie diffusing gives great volume, but can result in some frizz and some odd-shaped ends. It takes me about 45 minutes to pixie diffuse until 90% dry.
Hover diffusing can prevent odd-shape ends. Gives a bit less volume, but may result in less frizz due to less contact. Took me 39 minutes to diffuse when hover-diffusing the entire time, and 42 minutes to diffuse when doing a combination of hover and pixie diffusing.
Hammock diffusing requires standing up and leaning over near a counter or other surface, but it can be done on high heat and takes the least amount of time out of all the diffusing methods, at just 30 minutes. It provides good volume, great definition, and natural curl patterns, no strange ends.
Net diffusing was mostly a disaster for me. It left my hair really poorly shaped, really poorly defined, and with weird lumpy volume. It also took a really long time to dry.
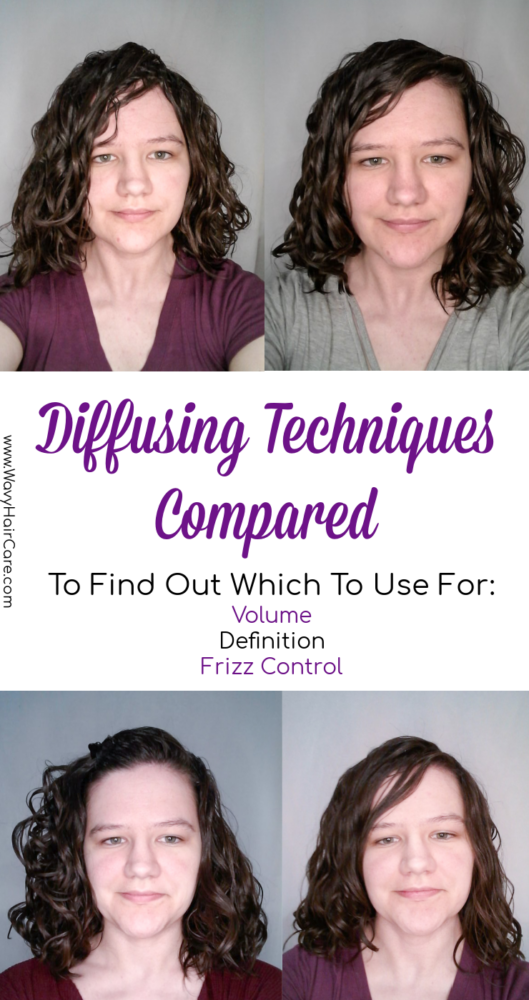
What is the best method for diffusing?
Pixie diffusing is the best diffusing method if you want maximum volume. Hover diffusing is the best diffusing method if you want minimal frizz. Hammock diffusing is the best way to diffuse if you want maximum definition, with good volume.
Conclusion: I think hammock diffusing is something I’m going to experiment more with! Right now I am working on comparing 10 different types of gel, and I started the tests with pixie diffusing. It’ll be similar to my wavy mousse comparison blog post, just for gel. So, I’ll continue pixie diffusing when testing gels for the sake of consistency.
Once those are up though, I think I might be a hammock diffuser! I love how it saved me about 15 minutes vs pixie diffusing, yet still gave me results I like. I do like BIG volume, and hammock diffusing gives me a little less volume than pixie diffusing – but I still got enough volume that I was happy with the results. I think it’s worth a bit less volume to save 15 minutes.
Most popular way to diffuse wavy hair
I polled a wavy-hair Facebook group to see which method of diffusing was most popular. 71 people responded.
The most popular way for wavy haired people to diffuse is hovering until a cast forms, then pixie diffuse.
Here are the full results:
| Style | Votes |
| Hover then pixie | 36 |
| Pixie full time | 20 |
| Hover full time | 11 |
| Hover then hammock | 2 |
| Net | 1 |
| Pixie then hover | 1 |
How to diffuse without frizz
If your ultimate goal is to diffuse without frizz, hover diffusing is your best option. When comparing four different ways to diffuse, hover diffusing gave me the least amount of frizz.
If you’re looking for other ways to avoid frizz, check out my blog post How To Fix Frizzy Wavy Hair.
More questions about diffusing your hair?
I have received a lot of questions about diffusing beyond just how to diffuse. This post was long enough, so I have a diffusing wavy hair questions answered blog post covering more!
[…] – I have a new blog post showing 4 tutorials for diffusing wavy hair. It also shows results for all 4 methods so you can see which methods are best for various styling […]